
파이썬 프론트엔드 프레임워크로 핫한 파인콘을 설치하고 테스트해보았습니다.
아직 버전이 0.1.12이긴 하지만 현재 제공되는 기능을 봤을 때 매력적인 부분이 분명히 존재하였습니다.

파인콘은 파이썬으로 구현하는 프론트엔드 프레임워크로 파이썬 소스를 리액트로 변환해서 동작하는 구조입니다.
프론트엔드 개발자이거나 풀스택 개발자라면 관심이 가지 않을 수 있는 주제이지만 파이썬 개발자가 프론트엔드를 구현할 때는 매우 도움이 될 수 있습니다.
가상 환경 설정
가상환경 설정은 필수가 아니지만 이미 파이썬 모듈을 설치하고 있었다면 저처럼 충돌이 발생할 수도 있기 때문에 가상환경으로 설정하는 것을 추천합니다.
저는 기존 사용하던 redis-cluster 모듈이 redis3.X 버전을 사용하고 있기 때문에 pynecone 설치 시 필요한 redis4.4 버전과 충돌이 발생하는 상황이 발생하였습니다.
그래서 가상환경을 설정하고 설치를 진행하였습니다.
가상환경 폴더는 일반 폴더와 혼돈이 생길 수 있기 때문에 .pynecone 라서 설정합니다.
가상환경을 activate 시키면 프롬프트 앞에 (.pynecone) 라고 표시됩니다.
$ python3 -m venv .pynecone

$ source .pynecone/bin/activate
(.pynecone) $
만약 가상 환경을 벗어나고 싶다면 deactivate 명령을 실행하면 됩니다.
(.pynecone) $ deactivate
모듈 설치
pip3 명령으로 pynecone-io 모듈을 설치합니다.
fastapi 관련된 모듈을 포함하여 꽤 많은 모듈이 설치되네요.
(.pynecone) $ pip3 install pynecone-io

...

Installing collected packages: sniffio, idna, typing-extensions, rfc3986, h11, greenlet,
certifi, anyio, tenacity, starlette, sqlalchemy2-stubs, SQLAlchemy, pygments, pydantic,
httpcore, commonmark, click, async-timeout, websockets, uvicorn, typer, sqlmodel, rich,
redis, plotly, httpx, gunicorn, fastapi, pynecone-io
프로젝트 폴더를 생성합니다.
(.pynecone) $ mkdir first_app
(.pynecone) $ cd first_app
(.pynecone) $ pc init
Node.js version 12.22.0 or higher is required to run Pynecone.
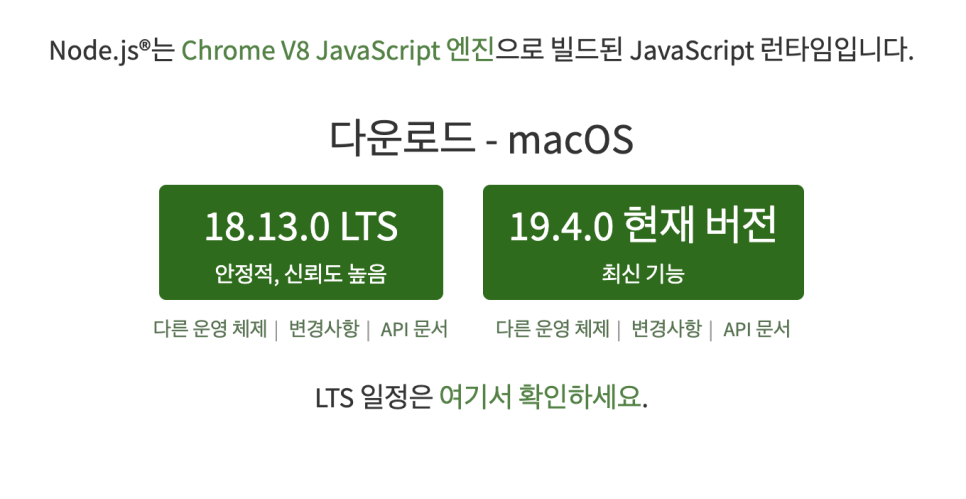
프로젝트 초기화하려고 하니 node.js가 필요하다고 하네요.
LTS 버전으로 다운로드 하였습니다.
노드 설치 후 다시 프로젝트 초기화를 해보겠습니다.
$ pc init
[16:30:54] Installing bun...                                                                                                                                 utils.py:427
⠇ Initializing first_app  % Total    % Received % Xferd  Average Speed   Time    Time     Time  Current
                                 Dload  Upload   Total   Spent    Left  Speed
100  7191    0  7191    0     0  28824      0 --:--:-- --:--:-- --:--:-- 32538
######################################################################## 100.0%
⠇ Initializing first_appbun was installed successfully to ~/.bun/bin/bun

⠦ Initializing first_appAdded "~/.bun/bin" to $PATH in "~/.zshrc"

To get started, run:

 exec /bin/zsh
  bun --help
[16:31:00] Initializing the web directory.                                                                                                                   utils.py:412
           Initializing the app directory.                                                                                                                   utils.py:401
           Finished Initializing: first_app
프로젝트 실행 / 확인
$ pc run
───────────────────────────────────────────────────────────────────────── Starting Pynecone App ─────────────────────────────────────────────────────────────────────────
───────────────────────────────────────────────────────────────────── Installing frontend packages ──────────────────────────────────────────────────────────────────────
bun install v0.4.0 (a94bba63)
────────────────────────────────────────────────────────────────────────────── App Running ──────────────────────────────────────────────────────────────────────────────
$ next dev
ready - started server on 0.0.0.0:3000, url: http://localhost:3000
event - compiled client and server successfully in 5.4s (757 modules)
Attention: Next.js now collects completely anonymous telemetry regarding usage.
This information is used to shape Next.js' roadmap and prioritize features.
You can learn more, including how to opt-out if you'd not like to participate in this anonymous program, by visiting the following URL:
https://nextjs.org/telemetry
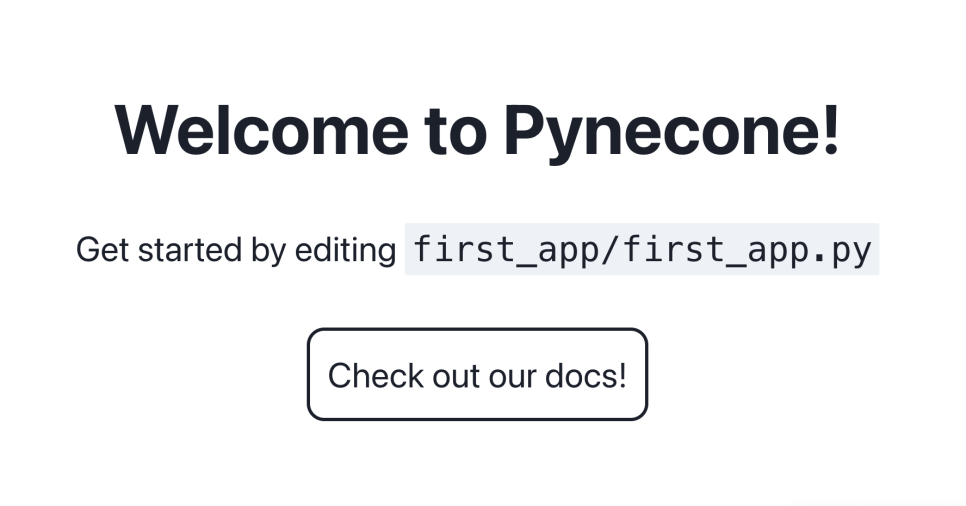
브라우저로 localhost:3000 접속하면 아래와 같은 화면이 나옵니다.
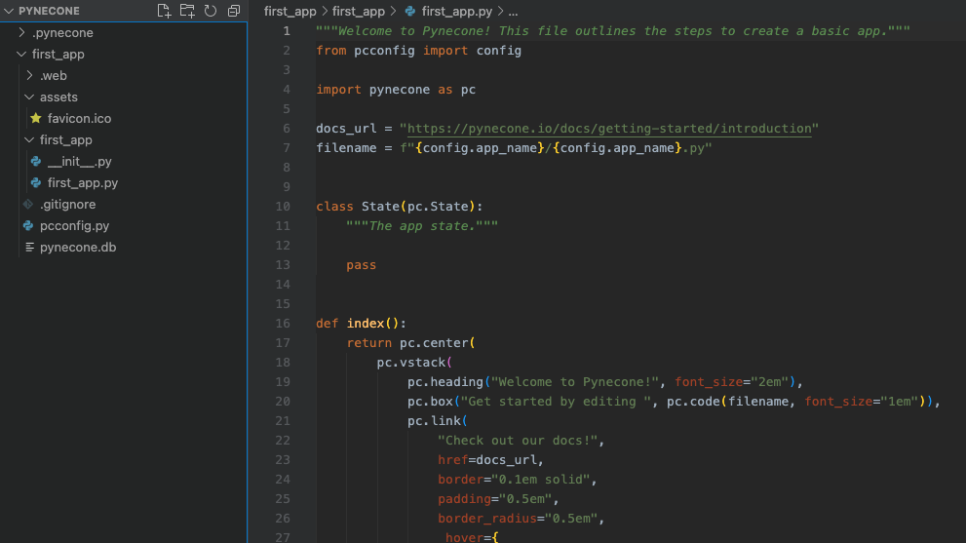
프로젝트 구조
프로젝트 초기화로 생성된 폴더 구조와 기본 파일입니다.
|
폴더
|
역할
|
|
.web
|
NextJS로 컴파일된 파일이 있는 폴더
|
|
assets
|
이미지와 같은 정적파일을 저장하는 폴더
|
|
first_app/first_app.py
|
프로젝트명과 동일한 폴더/파일이 메인 파일
|
|
pcconfig.py
|
앱이름 및 DB 설정
|
|
pynecone.db
|
SQLite DB 파일
|
'Python' 카테고리의 다른 글
| 장고(django) URL 정규식 사용하기 (0) | 2023.05.15 |
|---|---|
| pynecone 페이지 추가 (0) | 2023.01.27 |
| Python으로 Firestore Database (클래스를 통한 입출력) (0) | 2023.01.25 |
| Python으로 Firestore Database 다루기 (설정 / CRUD) (0) | 2023.01.25 |
| Python dataclass 사용하기 (0) | 2022.12.29 |


